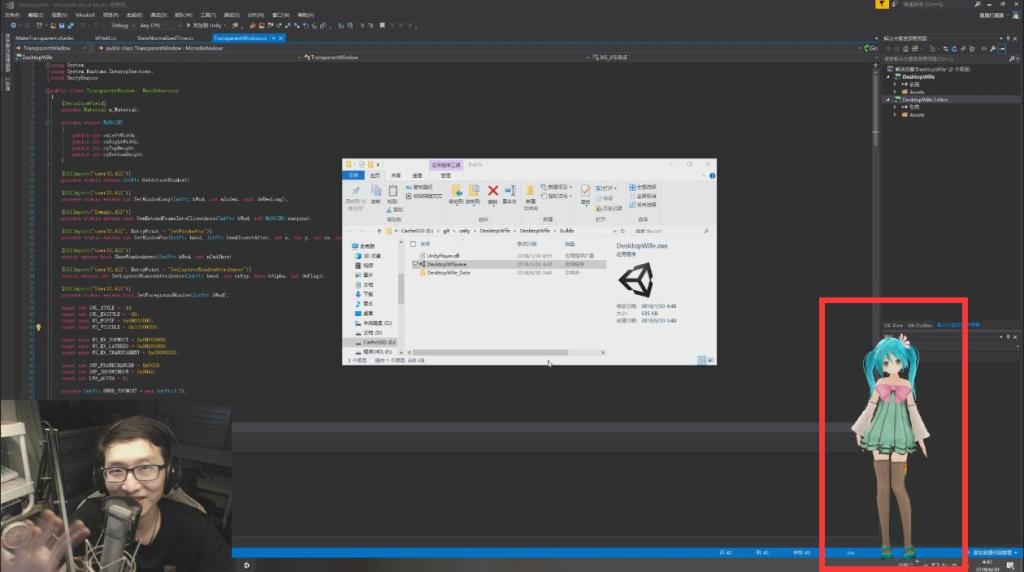
如何使Unity窗口透明置顶,且鼠标可以穿透点击

这里需要感谢给予我极大参考帮助的两个帖子:

https://forum.unity.com/threads/solved-windows-transparent-window-with-opaque-contents-lwa_colorkey.323057/
https://answers.unity.com/questions/869378/viewing-desktop-in-scene.html

可以实现如图的效果:

可以实现的置顶效果演示图

实现透明置顶窗口的代码如下:

using System;
using System.Runtime.InteropServices;
using UnityEngine;

public class TransparentWindow : MonoBehaviour
{
    [SerializeField]
    private Material m_Material;

    private struct MARGINS
    {
        public int cxLeftWidth;
        public int cxRightWidth;
        public int cyTopHeight;
        public int cyBottomHeight;
    }

    [DllImport("user32.dll")]
    private static extern IntPtr GetActiveWindow();

    [DllImport("user32.dll")]
    private static extern int SetWindowLong(IntPtr hWnd, int nIndex, uint dwNewLong);

    [DllImport("Dwmapi.dll")]
    private static extern uint DwmExtendFrameIntoClientArea(IntPtr hWnd, ref MARGINS margins);

  [DllImport("user32.dll", EntryPoint = "SetWindowPos")]
  private static extern int SetWindowPos(IntPtr hwnd, IntPtr hwndInsertAfter, int x, int y, int cx, int cy, int uFlags);

  [DllImport("user32.dll")]
  static extern bool ShowWindowAsync(IntPtr hWnd, int nCmdShow);

  [DllImport("user32.dll", EntryPoint = "SetLayeredWindowAttributes")]
  static extern int SetLayeredWindowAttributes(IntPtr hwnd, int crKey, byte bAlpha, int dwFlags);

  [DllImport("User32.dll")]
  private static extern bool SetForegroundWindow(IntPtr hWnd);

  const int GWL_STYLE = -16;
  const int GWL_EXSTYLE = -20;
  const uint WS_POPUP = 0x80000000;
    const uint WS_VISIBLE = 0x10000000;

  const uint WS_EX_TOPMOST = 0x00000008;
  const uint WS_EX_LAYERED = 0x00080000;
  const uint WS_EX_TRANSPARENT = 0x00000020;

  const int SWP_FRAMECHANGED = 0x0020;
  const int SWP_SHOWWINDOW = 0x0040;
  const int LWA_ALPHA = 2;

  private IntPtr HWND_TOPMOST = new IntPtr(-1);

  private IntPtr _hwnd;

  void Start()
    {
#if !UNITY_EDITOR
    MARGINS margins = new MARGINS() { cxLeftWidth = -1 };
    _hwnd = GetActiveWindow();
    int fWidth = Screen.width;
    int fHeight = Screen.height;

        SetWindowLong(_hwnd, GWL_STYLE, WS_POPUP | WS_VISIBLE);
    SetWindowLong(_hwnd, GWL_EXSTYLE, WS_EX_TOPMOST | WS_EX_LAYERED | WS_EX_TRANSPARENT);
        DwmExtendFrameIntoClientArea(_hwnd, ref margins);
        SetWindowPos(_hwnd, HWND_TOPMOST, 0, 0, fWidth, fHeight, SWP_FRAMECHANGED | SWP_SHOWWINDOW); 
        ShowWindowAsync(_hwnd, 3); //Forces window to show in case of unresponsive app    // SW_SHOWMAXIMIZED(3)
#endif
  }

  void OnRenderImage(RenderTexture from, RenderTexture to)
    {
        Graphics.Blit(from, to, m_Material);
    }
}
这里需要给挂上TransparentWindow脚本的主摄像机的脚本处挂上一个material,并使用以下的Shader实现背景的透明:
Shader "Custom/MakeTransparent" {
  Properties {
    _MainTex ("Base (RGB)", 2D) = "white" {}
    _TransparentColorKey ("Transparent Color Key", Color) = (0,1,0,1)
    _TransparencyMargin ("Transparency Margin", Float) = 0.01 
  }
  SubShader {
    Pass {
      Tags { "RenderType"="Opaque" }
      LOD 200
    
      CGPROGRAM

      #pragma vertex VertexShaderFunction
      #pragma fragment PixelShaderFunction
    
      #include "UnityCG.cginc"

      struct VertexData
      {
        float4 position : POSITION;
        float2 uv : TEXCOORD0;
      };

      struct VertexToPixelData
      {
        float4 position : SV_POSITION;
        float2 uv : TEXCOORD0;
      };

      VertexToPixelData VertexShaderFunction(VertexData input)
      {
        VertexToPixelData output;
        output.position = UnityObjectToClipPos (input.position);
        output.uv = input.uv;
        return output;
      }
    
      sampler2D _MainTex;
      float3 _TransparentColorKey;
      float _TransparencyMargin;

      float4 PixelShaderFunction(VertexToPixelData input) : SV_Target
      {
        float4 color = tex2D(_MainTex, input.uv);
      
        float deltaR = abs(color.r - _TransparentColorKey.r);
        float deltaG = abs(color.g - _TransparentColorKey.g);
        float deltaB = abs(color.b - _TransparentColorKey.b);

        if (deltaR < _TransparencyMargin && deltaG < _TransparencyMargin && deltaB < _TransparencyMargin)
        {
          return float4(0.0f, 0.0f, 0.0f, 0.0f);
        }

        return color;
      }
      ENDCG
    }
  }
}

B站评论抽奖Javascript代码

《200多元的树莓派能给你的生活带来多大变化》的这一期视频中,踢踢使用了自己写的一个javascript脚本来实现评论抽奖,有不少小伙伴想要抽奖脚本的源代码,这里我就分享出来,简单地解释一下原理。

每一次点击B站视频下方的评论页码时都会看到有一条jsonp请求发出,如图:

双击打开后发现请求的地址为:https://api.bilibili.com/x/v2/reply?callback=jQuery172009350743824178642_1526364237871&jsonp=jsonp&pn=3&type=1&oid=22995513&sort=0&_=1526364249684

分析一下就可以得出,请求地址的格式为:https://api.bilibili.com/x/v2/reply?callback=<callback函数名>&jsonp=jsonp&pn=<评论页码>&type=1&oid=<视频AV号>&sort=<排序方式>&_=<时间戳>

由于B站做了请求防跨域处理,因此打算简单地用javascript代码贴入B站的console来执行(其实可以写成一个chrome插件,但是我懒,打我呀~)

由于jsonp不支持同步拉取数据,因此会导致大批量拉取评论,有些内容会丢失,因此将jsonp请求嵌套,一个请求succ的处理中再调用下一个请求,保证所有请求按序且完整地收到。

以下就是源代码,在console中执行后,只需要执行StartDraw(开始页码, 结束页码, 评论筛选开始时间, 评论筛选结束时间, 抽奖人数)即可抽出结果,

var userData = {};
var startPage = 0;
var endPage = 0;
var startTime = "";
var endTime = "";
var pickSum = 0;

var dateItem = new Date();

function StartDraw(_startPage, _endPage, _startTime, _endTime, _pickSum)
{
  startPage = _startPage;
  endPage = _endPage;
  startTime = _startTime;
  endTime = _endTime;
  pickSum = _pickSum;
  GetUserData();
}

function GetUserData()
{
  GetOneData(startPage, endPage);
}

function callback(data)
{

}

function GetOneData(page, maxPage)
{
  urlLocationParams = window.location.pathname.split("/");
  avID = urlLocationParams[urlLocationParams.length - 1].split("av")[1];
  var url = "https://api.bilibili.com/x/v2/reply?callback=callback&jsonp=jsonp&pn=" + page + "&type=1&oid=" + avID + "&sort=0&_=" + dateItem.getTime();
  $.ajax({
    url: url,
    type: 'get',
    dataType: 'jsonp',
    jsonpCallback: 'callback',
    success: function (data) {
      console.log(data);
      for (var j = 0; j < data.data.replies.length; j++) {
        var reply = data.data.replies[j];
        if (reply.ctime >= get_unix_time_stamp(startTime)
          && reply.ctime < get_unix_time_stamp(endTime)) {
          userData[reply.mid] = {};
          userData[reply.mid].uid = reply.mid;
          userData[reply.mid].floor = reply.floor;
          userData[reply.mid].name = reply.member.uname;
          userData[reply.mid].content = reply.content.message;
        }
      }
      page += 1;
      if (page <= maxPage)
      {
        GetOneData(page, maxPage)
      }
      else
      {
        PickUser();
      }
    }
  });
}

function PickUser()
{
  userList = [];
  for (var user in userData)
  {
    userList.push(user);
  }
  shuffle(userList);
  for (var i = 0; i < pickSum; i++)
  {
    console.log(userData[userList[i]])
  }
}


function get_unix_time_stamp(strtime) 
{
  if (strtime) {
    var date = new Date(strtime);
  } else {
    var date = new Date();
  }
  time = date.getTime() / 1000;

  return time;
}

function shuffle(array) {
  length = array.length;
  for (var index = 0; index < array.length; index++)
  {
    var temp = array[index];
    var changeIndex = RandomNumBoth(0, length - 1);
    array[index] = array[changeIndex];
    array[changeIndex] = temp;
  }
}

function RandomNumBoth(Min,Max){
  var Range = Max - Min;
  var Rand = Math.random();
  var num = Min + Math.round(Rand * Range); 
  return num;
}